


Price: $11.99
(as of Apr 07, 2025 00:17:55 UTC - Details)
The Best Way to Apply Press-On Nails: A Comprehensive Guide
Introduction
Are you tired of spending hours at the salon for a manicure that never lasts? Press-on nails have emerged as a popular solution, offering a quick and easy way to achieve beautiful nails without the hefty price tag or time commitment. In this article, we’ll explore the best way to apply press-on nails, ensuring you get the perfect fit and finish every time. We'll cover everything from choosing the right nails to tips for a long-lasting application. So, let’s dive in and discover the secrets to flawless press-on nails!
What Are Press-On Nails?
Before we delve into the application process, let’s clarify what press-on nails are. Press-on nails are pre-designed artificial nails that you can easily adhere to your natural nails. They come in various shapes, sizes, and designs, making them a versatile choice for anyone looking to enhance their nail game.
Why Choose Press-On Nails?
Press-on nails are not just convenient; they also offer a plethora of benefits. They are generally affordable, easy to apply, and come in countless styles. Plus, you can change your look in minutes! Whether you’re heading to a party or just want to treat yourself, press-on nails can give you an instant confidence boost.
Choosing the Right Press-On Nails
Finding the Perfect Size
One of the key factors in achieving a flawless look is choosing the right size. Press-on nails come in various sizes to fit different nail beds. Here’s how to find the perfect fit:
-
Measure Your Nails: Use a ruler or measuring tape to measure the width of your natural nails at the widest point. This will help you select the right size press-on nails.
-
Check the Packaging: Most press-on nails come with a sizing guide on the package. Use this guide to find your ideal match.
- Try a Variety: If you’re unsure, consider buying a kit that includes multiple sizes. This way, you can mix and match to find the perfect fit.
Selecting the Right Style
Press-on nails are available in various styles, from natural looks to bold designs. When selecting the right style, consider the following:
- Occasion: Are you dressing up for a wedding or keeping it casual for everyday wear? Choose a design that fits the event.
- Personal Preference: Your nails should reflect your personality. Whether you prefer classic nude or vibrant patterns, there’s a press-on nail for everyone.
Preparing Your Natural Nails
Cleaning Your Nails
Before applying press-on nails, it’s crucial to prepare your natural nails. Here’s how to do it:
- Remove Old Polish: Use a nail polish remover to take off any old nail polish.
- Wash Your Hands: Clean your hands and nails with soap and water to remove any dirt and oils.
- Trim and File: If needed, trim your natural nails and file them to your desired shape. This helps the press-on nails adhere better.
Buffing for Better Adhesion
Buffing your nails is an essential step that often gets overlooked. Here’s why it matters:
- Creates Texture: Buffing creates a rough surface, allowing the adhesive to grip better.
- Improves Longevity: A well-prepared nail bed helps your press-on nails last longer.
To buff your nails, use a nail buffer or a fine-grit file, gently rubbing the surface of your nails.
Applying Press-On Nails
Using the Right Adhesive
The type of adhesive you use can make a significant difference in how long your press-on nails last. Here are a few options:
- Glue: Most press-on nails come with a tube of nail glue. This is the most common choice and provides a strong hold.
- Adhesive Tabs: These are double-sided stickers that are less permanent and easier to remove. They are great for short-term wear.
- Gel Adhesive: Some brands offer gel adhesives that provide a strong bond while being gentle on your natural nails.
Step-by-Step Application Process
Now that your nails are prepped, let’s go through the application process step-by-step:
- Choose Your Nail: Pick the press-on nail that fits your natural nail the best.
- Apply Adhesive: If you’re using glue, apply a small amount to the back of the press-on nail. If you’re using adhesive tabs, stick one to the back of the nail.
- Press and Hold: Align the press-on nail with your natural nail and press down firmly for about 10-15 seconds. This ensures a strong bond.
- Repeat: Continue this process for each nail until all press-on nails are applied.
Caring for Your Press-On Nails
Avoiding Water and Chemicals
To prolong the life of your press-on nails, it’s essential to avoid exposure to water and harsh chemicals. Here are some tips to keep in mind:
- Wear Gloves: If you’re doing dishes or cleaning, wear gloves to protect your nails.
- Limit Soaking: Try to avoid soaking your hands in water for extended periods.
Regular Maintenance
Just like natural nails, press-on nails require some maintenance. Here are a few simple steps:
- Check for Lifting: Regularly check your nails for any lifting at the edges. If you notice any, apply some additional glue to secure them.
- Avoid Tough Activities: Try not to use your nails as tools, as this can cause them to lift or break.
Removing Press-On Nails
Safe Removal Process
When it’s time to remove your press-on nails, it’s essential to do it safely to avoid damaging your natural nails. Here’s how:
- Soak Your Nails: Fill a bowl with warm, soapy water and soak your hands for about 10-15 minutes. This helps loosen the adhesive.
- Gently Pry Off: Use a wooden stick or your fingers to gently pry the press-on nails off, starting at the edges.
- Use Nail Polish Remover: If any glue residue is left, use nail polish remover to clean it off.
Caring for Your Natural Nails Post-Removal
After removing your press-on nails, give your natural nails some TLC:
- Moisturize: Use cuticle oil or hand cream to hydrate your nails and cuticles.
- Rest: Allow your natural nails to breathe for a few days before applying new press-on nails.
Conclusion
In summary, applying press-on nails can be a fun and easy way to achieve beautiful nails without the salon hassle. By choosing the right size and style, preparing your natural nails properly, and following a straightforward application process, you can enjoy a stunning manicure that lasts. Remember to take care of your press-on nails and your natural nails for the best results. With the tips shared in this guide, you now know the best way to apply press-on nails and can flaunt gorgeous nails with confidence!
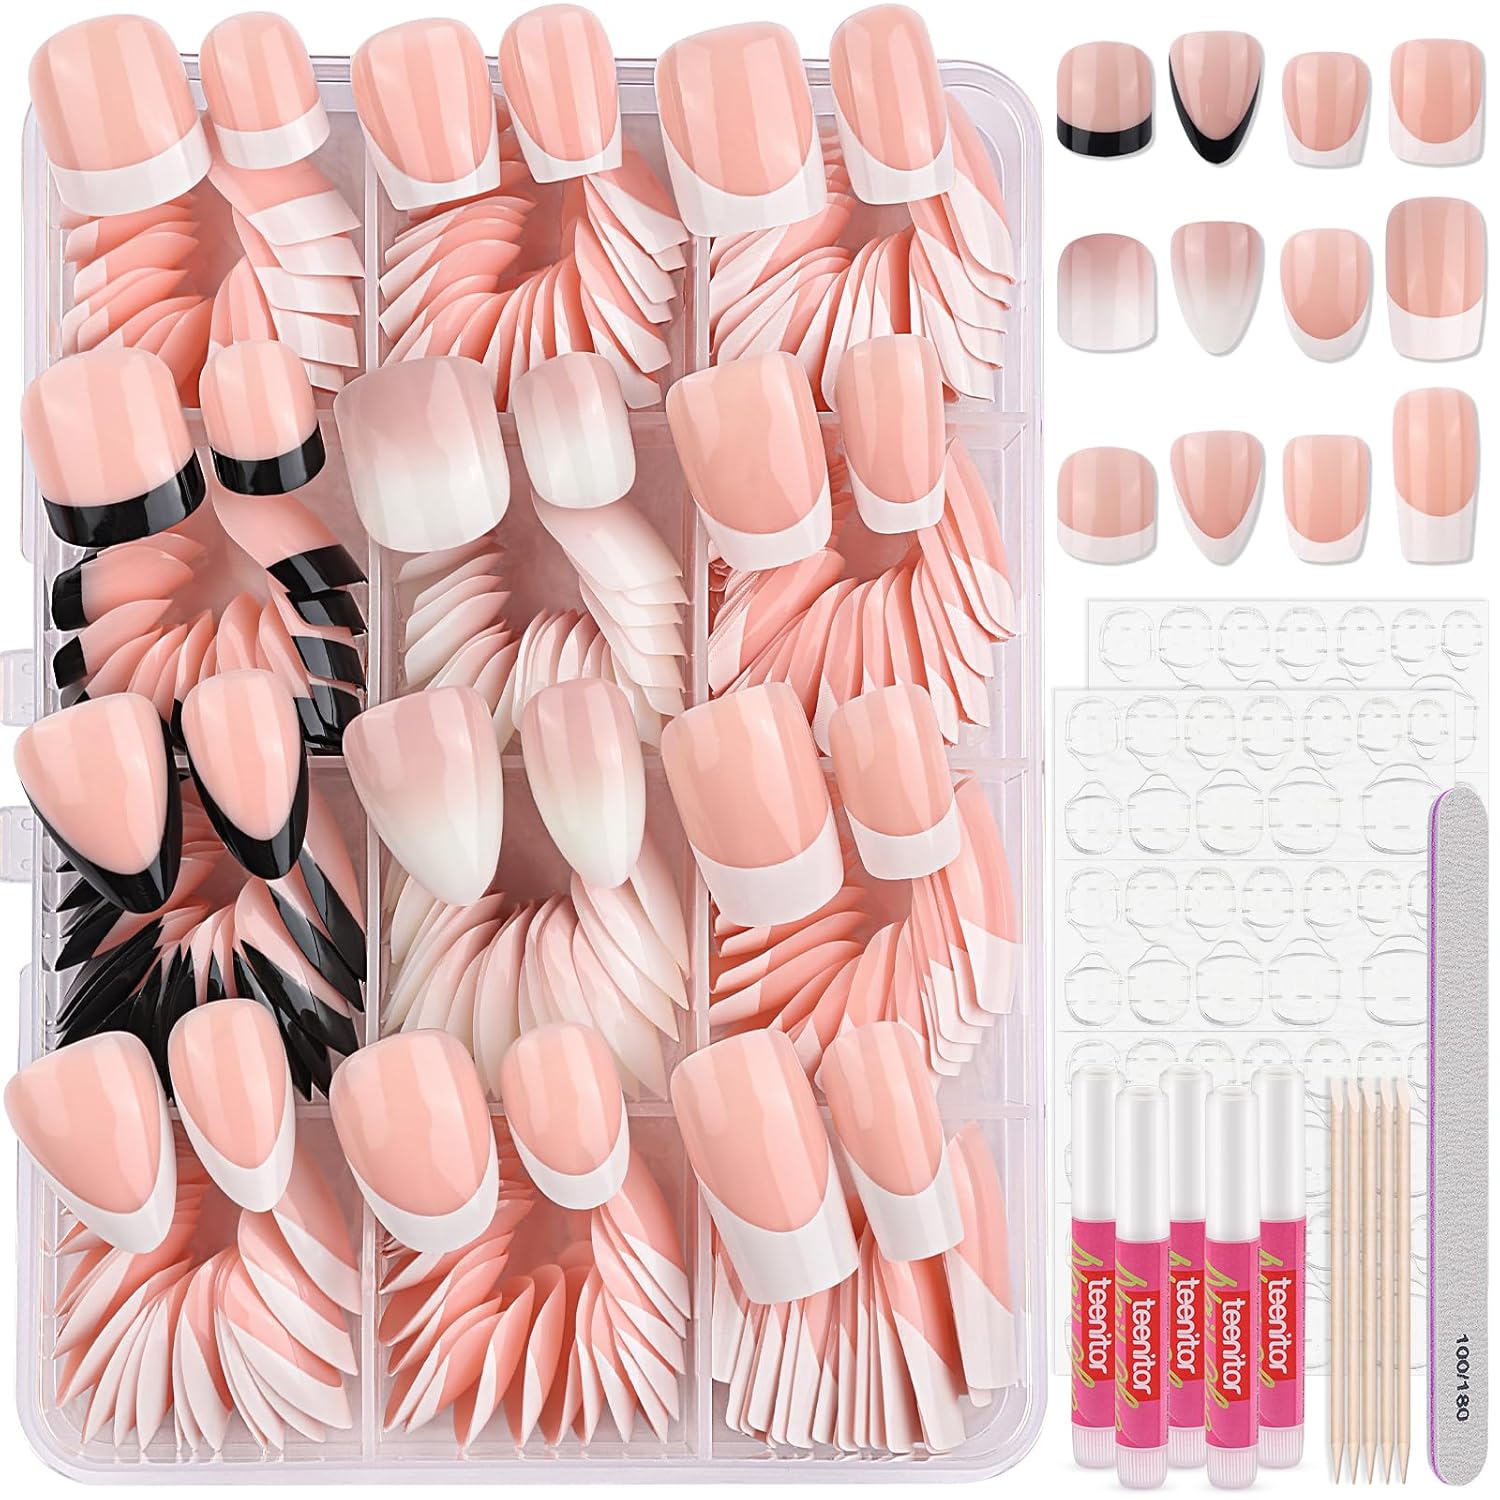
One Set Cater Your Different Nail Types Need: No need to run around to multiple links and stores, just one purchase and you can get 12 different nail designs of press on nails by nail shape or colors, you can get medium length and short nails press on at the same time, nail shape include square, almond, round, coffin, rectangle and squoval nails
12 Styles of Nails Press Ons: White Short Square French, White Almond French, Black Short Square French, Black Almond French, Short Square Ombre, Almond Ombre, Medium Square French, Medium Rectangle French, Round French, Squoval French, Medium Coffin French, Short Ballerina French
Different Shapes with Different Sizes: Please note that this set contains 8 different nails shapes and sizes are different, you will get 10-12 sizes of each shape. But for NO. 0, the biggest nails, we can not promise it can fit all nails bed, especially for somebody who has bigger nails bed.(Short Ballerina and Medium Rectangle shape only 0.51inch width, Medium Coffin is 0.53inch width, others can reach 0.55-0.59inch width)
Ultra Light & Thin Press Ons Nails: Made of great material, flexible but soft, malleable and fit both flat and curved nail bed; sturdy and won’t crack easily. French tips are base on nude color and draw the tip by white, top with glossy coat, not easily wear away. These classic french design and ombre nails will make your nails looks natural and elegant
2 Ways to Wear Short Press on Nails: You will get 5pcs nail glue and 2 sheets nail adhesive tabs for toe and 2 sheets nail adhesive tabs for finger at the same time- You can apply nail glue on your nail, this way make your nail looks natural and can stay for longer time(14-21 days), 1pc nail glue can be used for at least 2 sets french tip nails; Or you can apply nail adhesive tabs with nail tip, last 5-7 days but will not damage your nails, easy to apply or remove in few minutes, which make these french nails reusable
Functional Nail File & Orange Wood Stick: 100/180 grit nail file is double side, printed side is fine grit-180 grit, suitable for shaping fake nail tip or natural nails, blank side is rough grit-100 grit, you can use it to trim your nails or remove top coat of polish.Flat end of wooden stick will help push back dead skin and shape it, help lift fake nail from nail surface, pointed end can help clean nail dirt, adjust nail decoration, help clean nail polish outside your nails