


Price: $9.99
(as of Apr 11, 2025 15:46:48 UTC - Details)
The Best Way to Apply Press-On Nails: A Comprehensive Guide
Introduction
If you’re looking for a quick and stylish way to enhance your nails, press-on nails are an excellent choice. These versatile nail designs are perfect for anyone who desires beautiful nails without the hassle of a salon visit. In this article, we’ll explore the best way to apply press-on nails, ensuring you achieve a flawless look that lasts. Whether you’re a beginner or a seasoned nail enthusiast, this guide will provide you with practical tips and tricks. Let’s dive into the world of press-on nails and discover how to make them work for you!
Understanding Press-On Nails
Press-on nails come in various shapes, sizes, and designs. They are made from materials like acrylic or plastic and are designed to fit over your natural nails. One of the best things about press-on nails is their convenience; you can apply them at home in just a few minutes. But to achieve the best results, it’s crucial to understand how to apply them properly.
Choosing the Right Press-On Nails
Before you apply your press-on nails, it’s essential to choose the right set. Look for nails that match your style and preferences. You can find options in various lengths, colors, and designs. If you’re unsure where to start, consider a classic French tip or a solid color that complements your wardrobe.
Preparing Your Natural Nails
Preparation is key to ensuring your press-on nails adhere well. Start by cleaning your natural nails thoroughly. Remove any old polish and gently push back your cuticles. You want a smooth surface for the press-on nails to attach. A little nail buffer can help create that perfect foundation.
Selecting the Right Adhesive
The adhesive you choose plays a significant role in how long your press-on nails will last. Some press-on nails come with pre-applied adhesive, which can be convenient. However, if you want a more durable hold, consider using nail glue. Be cautious with glue application; a small amount goes a long way.
Applying Press-On Nails: Step-by-Step Guide
Now that you’re ready, let’s walk through the steps for applying press-on nails effectively.
Step 1: Size Matching
Before you start applying, lay out the press-on nails and match them to each of your natural nails. This step ensures that each nail fits well without any gaps. If a nail is too wide, you can gently file it down for a better fit.
Step 2: Clean and Dry
Once you’ve matched the nails, wash your hands again and dry them thoroughly. Any moisture or oil on your nails can prevent the adhesive from sticking properly.
Step 3: Applying the Nails
If you’re using adhesive tabs, peel off the backing and stick them to your natural nail. If you’re using nail glue, apply a small dot to the center of your nail. Press the corresponding press-on nail onto your natural nail, holding it down for about 10-15 seconds. This ensures a secure hold.
Step 4: Finishing Touches
After applying all your press-on nails, take a moment to trim and shape them if needed. You can also apply a clear top coat to enhance shine and longevity. This step will not only give your nails a polished look but will also help protect them from chipping.
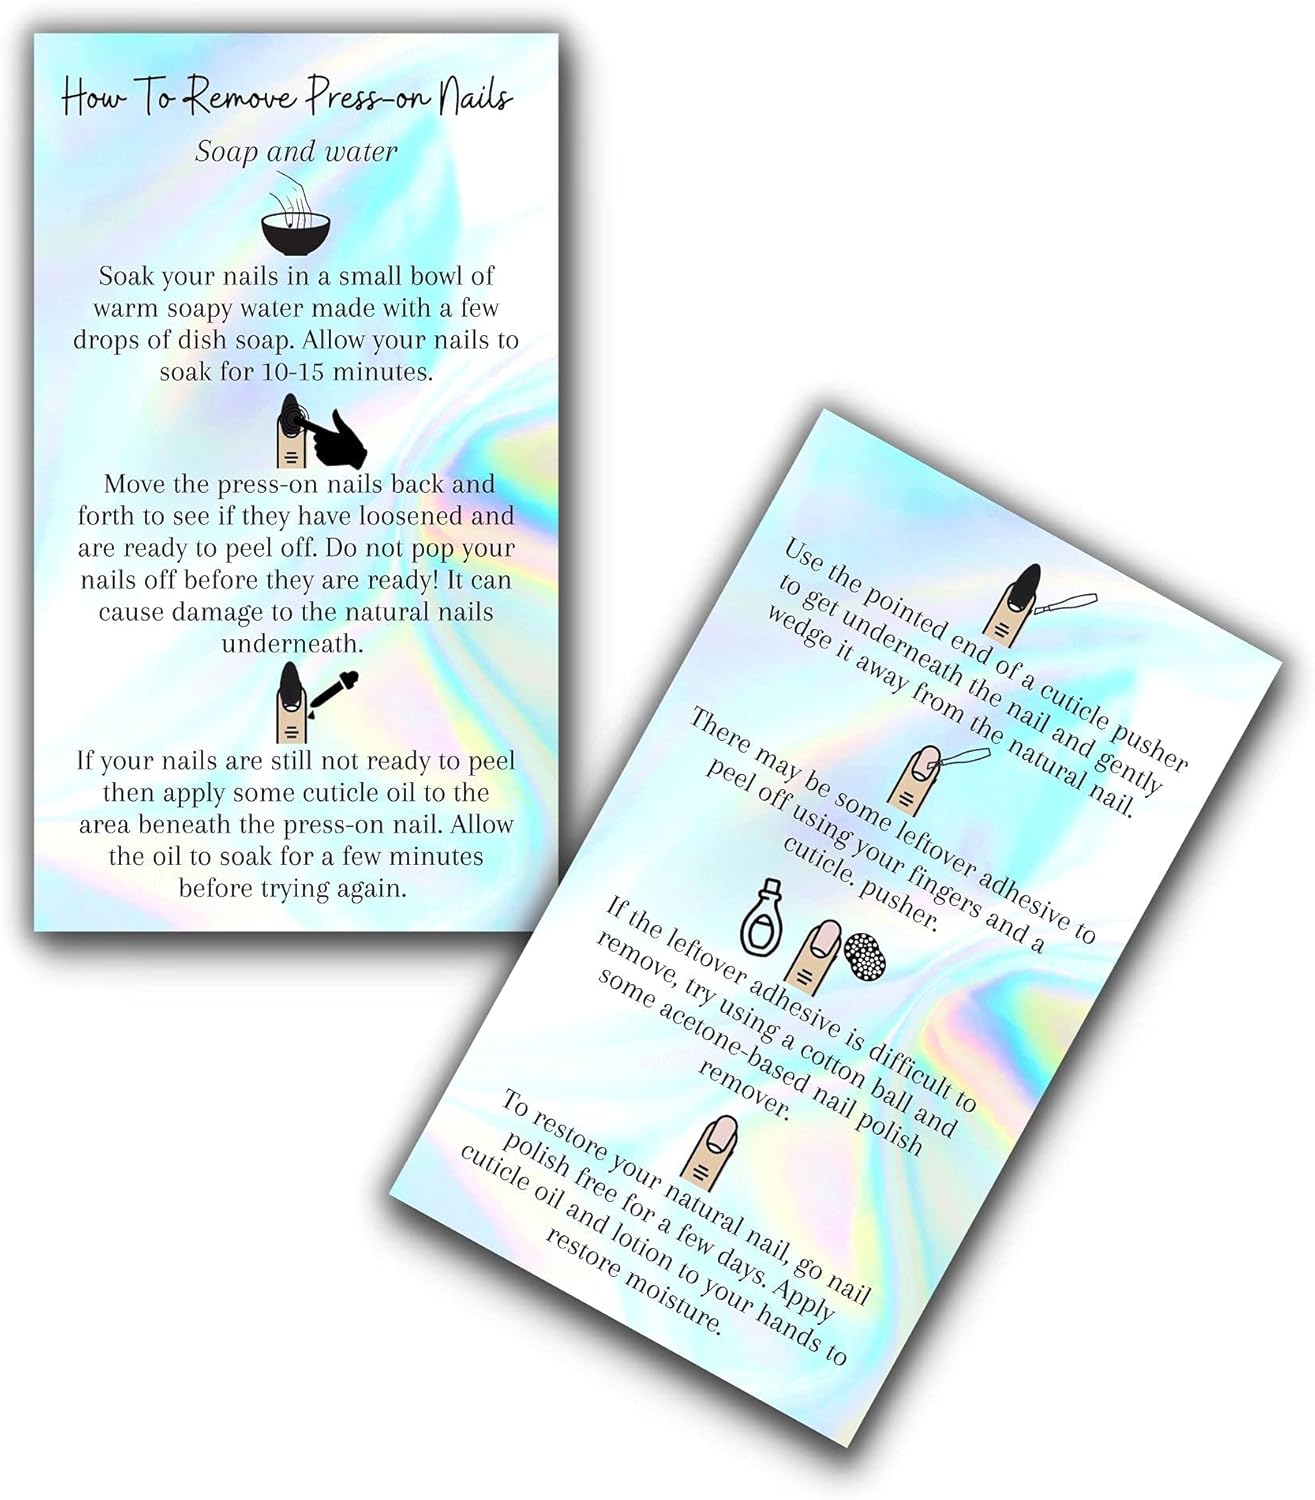
Step 5: Aftercare
To make your press-on nails last, take care of them. Avoid using your nails as tools and keep them dry. When it’s time to remove them, gently soak your nails in warm, soapy water to loosen the adhesive.
Troubleshooting Common Issues
Even though applying press-on nails is straightforward, you might encounter a few challenges. Here are some common issues and how to solve them.
Nail Pops Off Too Soon
If a nail pops off shortly after application, it could be due to moisture or oil on your nails. Ensure your nails are clean and dry before application. Also, check if you’re using enough adhesive.
Uneven Fit
If your press-on nails don’t fit evenly, consider filing them down for a better shape. Every nail is unique, and a little adjustment can make all the difference.
Damage to Natural Nails
To avoid damaging your natural nails, don’t force off the press-on nails. Always soak them in warm, soapy water to loosen the adhesive. Taking your time will help maintain your nail health.
Conclusion
In conclusion, applying press-on nails can be a fun and rewarding experience when done correctly. By following the steps outlined in this guide, you can achieve a beautiful and long-lasting manicure at home. Remember to choose the right nails, prepare your natural nails, and apply them with care. With these tips, you’ll be able to flaunt stunning nails effortlessly. Whether you’re preparing for a special occasion or just want to elevate your everyday look, press-on nails are the way to go. Now that you understand the best way to apply press-on nails, it’s time to get started and enjoy your fabulous new look!
50 TOTAL CARDS printed on a 3.5 x 2 inch inch card. 14 pt. matte card stock thickness!
How to remove press on nails using soap and water.
All holographic designed cards appear exactly as listed with a printed ''holographic-like'' multi colored image only for a background on a paper card stock. Our cards are not actually 3D holograms with light diffractive properties.
Matches press on nail application cards in matte rainbow holographic look design.
We LOVE to see how you add our cards to your aftercare kits, cases, kit bags, beginning kits, and display them with your organizers! Please submit pics to us in your feedback!
Paper size: 3.5-x-2